Upcycling grandmother’s original wooden ironing board, Upcycled into a storage table, Many different ways to repurpose wooden ironing boards
From 1808 Magazine.
“My grandmother’s original ironing board was a wooden, folding contraption with a cover tacked to it. My mom ironed on a basic folding metal board with a removable padded fabric cover. My ironing board is metal like mom’s, but it’s adjustable to various heights for ergonomics. The insulated cover is a pretty floral print, picked to match my laundry room. But with wrinkle-free fabrics and our more casual lifestyle, I rarely use it.
As time passes, ironing boards may go the way of rotary telephones, transistor radios, typewriters and other “essential” household items.
I love household objects and furnishings with history. So when I look at a wooden ironing board, I like to imagine its future as well as its past. I may not want to iron on it, but that doesn’t mean it’s done for.
I love household objects and furnishings with history. So when I look at a wooden ironing board, I like to imagine its future as well as its past. I may not want to iron on it, but that doesn’t mean it’s done for.
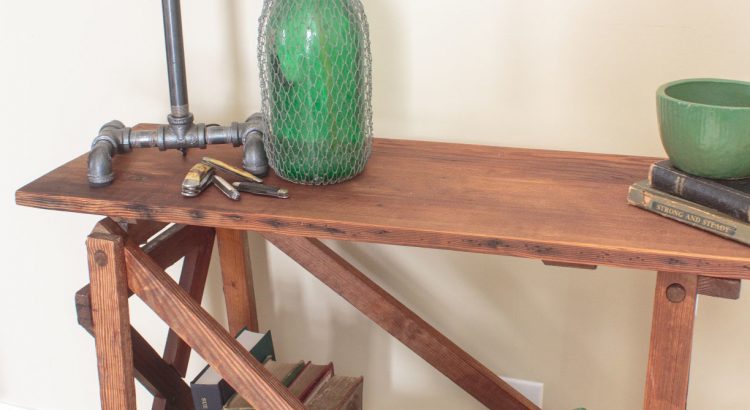
My dad and I recently worked together to upcycle a wooden ironing board into a storage table. Dad is a retired engineer, and he’s always had a knack for fixing and shoring up the old furniture my mom brought home from yard sales.
Previously, my dad converted his mom’s wooden ironing board into a table, replacing the folding legs with industrial steel pipe.
There are many different ways to repurpose wooden ironing boards. I’ve seen the tops converted into signs, wine storage and floating shelving. Others have upcycled their boards into coffee bars or portable desks.
We picked up this particular ironing board for $8 at a warehouse sale. Search yard sales and estate sales, flea markets, antiques stores, Etsy, or your grandma’s attic to find one to repurpose.
It was good to have Dad’s DIY and engineering know-how to figure out the best way to complete this upcycle. But this is an easy project for beginners. The only tool you really need is a drill, for securing screws and making pilot holes. If you have a circular saw, you can use it to cut a few pieces of wood. If you don’t have one, the home improvement store will make the cuts for you, usually for free.
For this upcycle, we decided to leave the folding base of the board intact, add a storage shelf to the bottom and stabilize the board. The exact measurements and hardware you’ll need for this project will vary, depending on the style of wooden ironing board you use.
First, you’ll need to remove the fabric board cover and any nails around the edge of the board.
Next, it’s time to stabilize the ironing board. Since we were converting ours into a table, we didn’t need it to fold up anymore. Our board had some hinges and screen door hook and eye hardware to facilitate folding. We removed those and added L-brackets to secure the base to the board top. We also used wood glue for more stability and security.”
Read more.